|
New
Diesel
Engines
Used
Diesel Engines
Industrial
Diesel Engines
Truck Diesel
Engines
Used
Generators
Diesel
Generators
Detroit
Diesel Generators
Truck
Generators - Idle Eliminator
Diesel Fuel Economizer KA3
Industrial
Generators
Home
Standby Generators
RV Generators
Natural
Gas, Propane LP
Generators
Emergency
Power Generators
Marine
Generators / Boat Generator
Diesel
Contractor Tools:
Welder
Generators
Air Compressors
Trash Pumps
Pressure Washers
View
Classifieds
Post
Classifieds
Automatic
Home Power Systems
Contact
Us - E-mail
Home
About
Us
Information
U.S.
Power Grid Map
California
Power and Diesel Generators
Power
Calculator - How to size a Generator
How
Altitude and Temperature Affect a Power Generator
The Electrical Power Store!
|
See
our full line of ETQ products:
Diesel Generators | Diesel
Welder Generators | Diesel Semi-Trash
Pumps
Diesel Pressure Washer | Gasoline
Power Generators | Gasoline Trash
Pumps | Gasoline Pressure
Washer
Gasoline Air Compressor
Sound Attenuated - 70 db at 7 meters

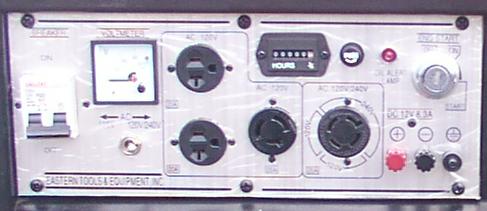
Control Panel (may vary from model to model)
STANDARD FEATURES
Electric start
Large Fuel Tank With 12 hours Continuous
Operating Capability
Soundproofing - 70db at 7meters
Front and Side Lockable Door
Design For Easy Maintenance
Automatic Voltage Regulator
Automatic Shutdown For Low Oil Pressure
Vibration Isolation Mounting Between
Engine/Alternator Feet & Base Frame
Reduce Vibration and Improving Durability
Non-Fused Breaker Protects For AC
Overload Protection and Convenience
AC Voltmeter, 110V/220V Switch
DC 12V Charging System(car/boat batteries)
Low Fuel Indicator, Oil alert
Ground Fault Interrupter
Dependable, Maintenance Free Alternator
Advanced Direct Fuel Injection System
Provide Low Fuel Consumption
All American Standard Receptacles
Remote Start
SPECIFICATIONS
|
Engine: |
ETQ 186FE |
|
Cylinders: |
Single Cylinder, 4
Cycle |
|
Displacement: |
24.78 Cubic Inches |
|
Cooling: |
Air Cooled |
|
Fuel Tank: |
3.3 Gal |
|
Generator: |
Electric Brushless |
|
Phase: |
Single |
|
Voltage: |
120/240 AC |
|
Amps: |
50 @ 120V, 25 @ 240V |
|
Frequency: |
60Hz |
|
Max
Output: |
6.0 KW |
|
Cont. Output: |
5.5 KW |
|
Weight: |
352 lbs |
|
(L x W X H) |
36.2" x 20.9" x 27.8" |
 Download PDF
Specification Sheet
(Requires Adobe Acrobat Reader)
 Download Product
Manual
(Requires Adobe Acrobat Reader)
One year warranty on parts and
labor. Battery not included.
Warranty repairs do not require
shipping to China. Warranty centers available in U.S.A.
Warranty repairs are free and manufacturer pays for one way return shipment
to customer.
FAQ
|
Q: |
How come my engine keeps shutting off even though there is sufficient
fuel and engine oil in the unit? |
|
A: |
The speed
governor might be too sensitive. To fix this problem, there is an 8mm
bolt on the speed governor. Loosen this bolt and move it up or down until
the sensitivity decreases. After the bolt has been set, tighten the bolt.
|
| |
|
|
Q: |
How come my generator is not producing enough voltage? |
|
A: |
Sometimes
the tension of the spring on the speed governor is too low. To fix this
issue, use a pair of needle nose pliers and bend the hook of the spring
up a little to increase the tension of the spring. Another way of solving
this problem is to loosen the two bolts on the speed governor and turn
the speed governor either clockwise or counterclockwise until the desired
voltage has been met. Also, the spring should have good tension with the
governor. A loose spring will not yield good results. |
| |
|
|
Q: |
How come my generator will not start? |
|
A: |
There may
be air packets in the fuel line. The fuel pump on the engine is a gravity
pump, not a sucking pump. To remedy this issue, the fuel line needs to be
bled of the air packets. Remove the rubber fuel line from the gravity
pump and let fuel drain into a small container. Then place the fuel line
back in place. To minimize wasting battery power, push the decompression
lever down and crank the engine. Once the lever pops back up, push the
lever down again and crank again. Repeat this procedure until you feel
that fuel is reaching the engine. Finally, leave the decompression lever
in the up position and crank the engine. The engine should start right
up. |
| |
|
|
Q: |
I
just bought a new generator and the engine does not crank and will not
start. What is the problem? |
|
A: |
Make sure
the battery is filled with electrolytic solution and fully charged before
using the generator. Due to shipping policies and safety issues, all ETQ
generators come with dry battery cells. Wet cells may spill during
shipping causing damage to the generator and harming people who will be
handling the unit. It is up to the consumer to fill the battery with the
correct acid and to fully charge it before using it. |
| |
|
|
Q: |
How come i am not getting a lot of fuel flow even though my fuel tank is
full? |
|
A: |
The fuel
filter may be over tightened causing the fuel filter gasket shape to
distort. The distorted shape of the rubber gasket may be blocking the
hole of the fuel filter preventing fuel from traveling down the fuel
line. When replacing the fuel filter, make sure the rubber gasket on the
fuel filter is placed on correctly and that the fuel filter is not
overtightened.. |
| |
|
|
Q: |
How often should i change the engine oil? |
|
A: |
For normal
use, engine oil should be changed every 100 hours of operation. For heavy
use (operating 15+ hours a day multiple days a week) we recommend the
consumer to change the oil every 50 hours of operation. Engine oil
changes depend on the frequency and duration an engine is subjected to.
|
| |
|
|
Q: |
What is engine break-in and how often should i change the oil? |
|
A: |
A break-in
period is required when an engine is new or whenever the cylinder walls
have been re-conditioned to accept new piston rings. An engine break-in
"seats" the piston rings against the cylinder walls to minimize both oil
consumption and blow-by of combustion gases. The engine oil should be
changed every 20 hours of use. Also, do not overload the engine during
the break-in period.
|
| |
|
|
Q: |
What kind of engine oil should i use in my diesel generator? |
|
A: |
For
optimum performance always use 15W40 oil or Delo 400 oil. Conventional or
synthetic oils are both fine to use. Note: Although some of the
generators ask to use 10W30 on the stickers above the unit, ALWAYS USE
15W40 GRADE OIL FOR BEST RESULTS. |
| |
|
|
Q: |
How come my generator is not producing the wattage of the model number? |
|
A: |
Our model
numbers are not based on wattage ratings. Our products model numbers are
independant from its specifications. |
| |
|
|
Q: |
Where is the fuel filter for my generator unit? |
|
A: |
The fuel
filter is under the fuel tank. It is located at the fuel outlet from the
fuel tank. There a few bolts two remove in order to get the fuel filter
out. The fuel filter should be changed periodically depending on the type
of environment the generator is operated in. If the generator is used in
a dusty and dirty environment, the fuel filter should be changed more
frequently. If operated in a cleaner environment, the fuel filter should
be changed based on the routine schedule stated in the owners manual.
NOTE: DO NOT OVERTIGHTEN THE BOLTS OF TH FUEL FILTER AS THIS MAY CAUSE
THE RUBBER FUEL FILTER GASKET TO DISTORT AND CLOG THE FUEL FLOW FROM THE
FUEL FILTER. |
| |
|
|
Q: |
Where is the oil filter for the diesel engine? |
|
A: |
The ETQ
diesel engines use a oil strainer instead of an oil filter. The oil
strainer is located on the far lower left of the speed governor on the
engine. Its usually black and looks like another oil dipstick, but
slightly different. Please refer to the owners manual for an illustration
of where the fuel strainer is. The fuel strainer should be cleaned every
time a oil change is performed. |
| |
|
|
Q: |
How come my generator is not producing any power at all? |
|
A: |
Check the
connections to the generators AVR to verify that they are secured to its
terminals. Due to the vibrations of the engine, sometimes these
connectors can come loose and get disconnected. To correct this problem,
remove the black cover off the back of the generator. Usually there are
two 8 or 10 mm bolts holding the black cover onto the generator. After
removing the black cover, the AVR is exposed. There are two wires
connected to the AVR, make sure the two wires are connected to the AVR
and secured tight to the terminals. The order of these wires does not
matter and the wires are not color coded. Just make sure they are
connected to the AVR and secured tight. Finally, replace the black cover
and start the unit. There should be power at the outlets now.
|
|


